

Sale!


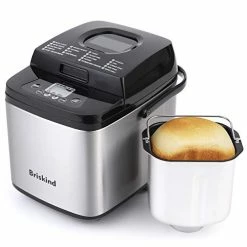
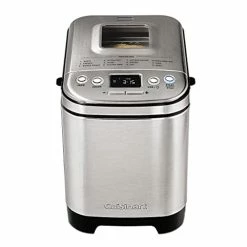
New 🎉 Hamilton Beach Bread Maker Machine Artisan And Gluten-Free, 2 Lbs Capacity, 14 Settings, Digital, Stainless Steel, Black And Stainless (29885) 🔔
Original price was: $87.95.$70.36Current price is: $70.36.
- Control the delivery date and try to deliver it in the fastest time
- The quality solution for all your needs.
- 100% High Quality Guarantee
- Safe Payments, Secure Personal Information

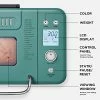
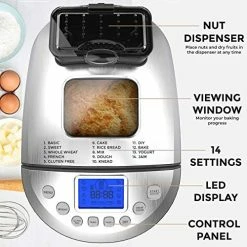
- Voltage: 120 Volts
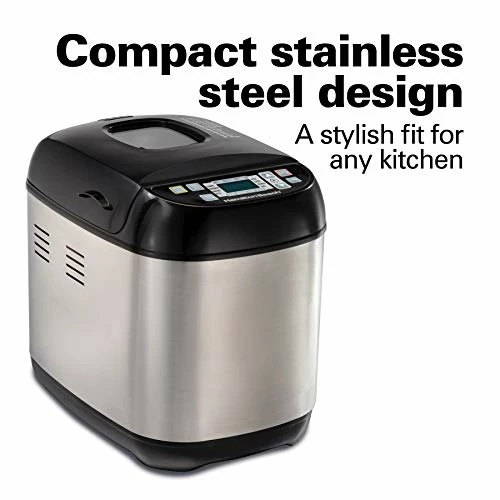
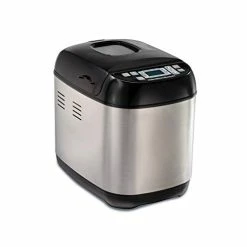
- Color: Black and Stainless
- Item Weight: 10 Pounds
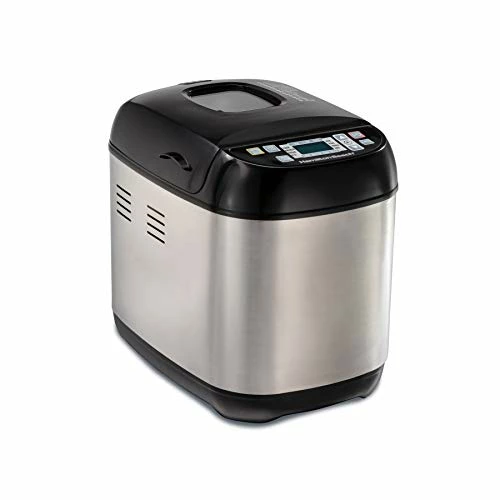
- Material: Stainless Steel
- Capacity: 2 Pounds
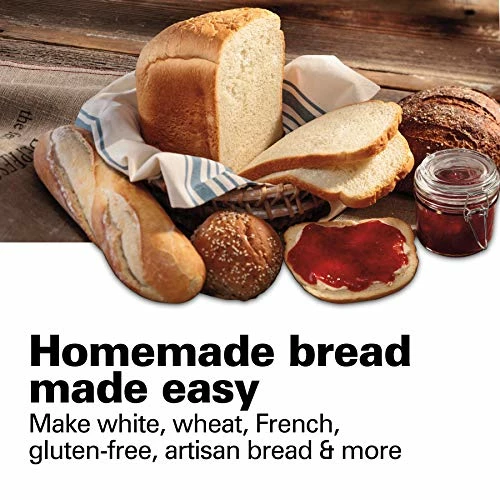
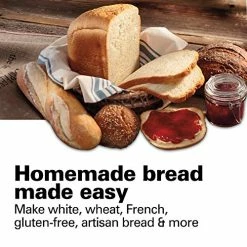
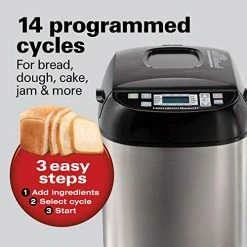
- Homemade Bread, Jam & Artisan Dough in 3 Easy Steps Add Ingredients, Select Cycle and Press Start Automatic Keep Warm After Cooking
- 14 Settings Including Gluten Free, Rise and Artisan Basic, French, Whole Grain, 15 LB Express, 2 LB Express, Quick Bread, Sweet, Dough, Cake, Jam, Rise, Bake, Artisan
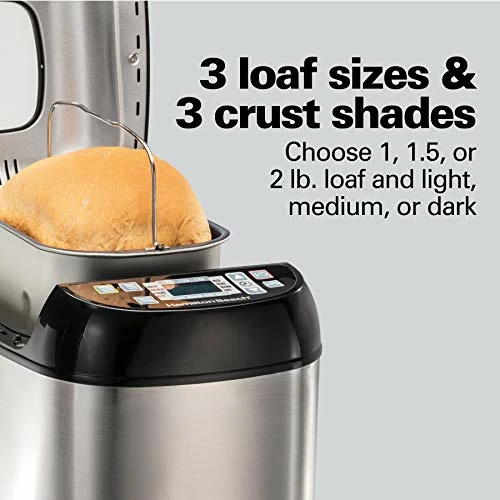
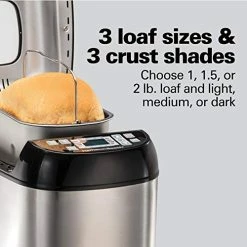
- 3 Loaf Sizes, 3 Crust Shades & Delay Start Choose From 1, 15 or 2 LB Loaf and Light, Medium or Dark Crust Shade Countdown Cooking Timer With Lcd Display Use Delay Timer to Add Ingredients and Begin the Baking Process Later
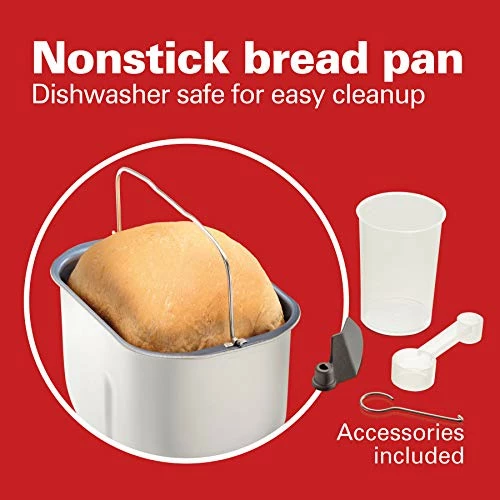
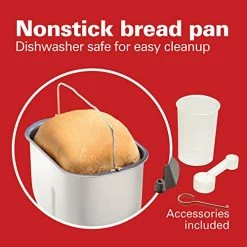
- Stainless Steel Exterior & Nonstick Interior Sleek Design With Stainless Steel Interior Pan Lifts out for Easy Bread Removal and Cleaning
- Accessories Included Measuring Cup & Spoon, Kneading Paddle & Paddle Removing Tool All Dishwasher Safe
8 reviews for New 🎉 Hamilton Beach Bread Maker Machine Artisan And Gluten-Free, 2 Lbs Capacity, 14 Settings, Digital, Stainless Steel, Black And Stainless (29885) 🔔
Add a review
Related products
Sale!


Original price was: $94.99.$75.99Current price is: $75.99.
Sale!

Original price was: $129.99.$84.00Current price is: $84.00.
Sale!

Original price was: $79.99.$63.99Current price is: $63.99.
Sale!

Original price was: $99.97.$83.00Current price is: $83.00.
Sale!
Original price was: $89.35.$71.48Current price is: $71.48.
Sale!
Original price was: $279.00.$82.00Current price is: $82.00.
Sale!

Original price was: $104.00.$80.00Current price is: $80.00.
Sale!

Original price was: $179.99.$96.00Current price is: $96.00.
Robby Krell –
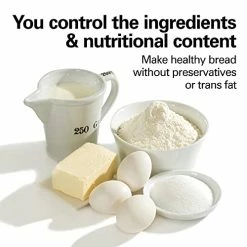
First off, I am an experienced bread maker but my one attempt to bake gluten-free bread was an abject failure. My wife cannot eat bread with gluten so after that failed attempt, I resorted to buying store-bought loaves, which were not very satisfying for her, but at least are recognizably bread lol.Fast forward 10 years or so, and those store-bought loaves were getting pretty tiresome, so I did some research and bought this bread maker along with a cookbook (The Gluten-Free Bread Machine Cookbook: 175 Recipes for Splendid Breads and Delicious Dishes to Make with Them by Jane Bonacci). I wasn’t sure how this would work out, and I figured there would be a learning curve but I would get there eventually.I was wrong. The success was immediate.I have now had this bread make for about 3 weeks and I have made bread 8 times; all attempts have been successful, and all but 1 have been delicious (more on that in a minute). The machine is extremely simple to operate: you mix the wet ingredients and put them in the pan, then the dry ones and layer them on top; make a little indentation for the yeast. Close the lid and hit the gluten free setting (#3) and stand back.It takes a few minutes for the paddle to start twirling, which confused me a little at first, but no worries. Once it starts, you need to spend a minute or so with a soft spatula (silicon) making sure that the dry ingredients in the corners of the pan get mixed in with the rest of the batter. After that, you can just go away for a couple hours and come back to fresh bread. It’s really quite remarkable. The loaves are moist, well risen, and very tasty. It’s as close to foolproof baking as I have found for this sometimes-finicky procedure. So far I have made millet bread (once), brown bread (twice), herb sandwich bread (four times) and a cardamom-almond quick bread (twice). My wife is thrilled and so am I, to the point where I hardly eat my regular old store-bought gluten breads anymore.The cookbook offers a couple useful tips that I think are crucial. The most important is to buy a scale to weight your ingredients. Gluten-free cooking is a delicate balancing act, and precise quantities are needed. Filling a cup measure with this ingredient or that can result in widely differing amounts depending on how packed the flours are; humidity (ie., moisture content) will affect this too. So I went to Walmart and bought a sleek kitchen scale for 20 bucks, and I would advise anyone trying this out to do the same.Another thing: the bread machine directions advise you to run the machine at “bake” cycle for 10 minutes and let it cool before using. This allows you to burn off the “factory chemical” smell and it’s crucial I think. Even so, the first loaf I made (millet bread) had a pretty strong chemically taste to it. Fortunately, I had made a second loaf right afterward (the brown bread) and this was much better, so we enjoyed that one. I’m not sure how to get around this–maybe another 10-minute burnoff? Not sure. It’s a minor thing, but worth remembering.As for the ingredients, they are all available on Amazon, or other markets like Whole Foods or even just ordinary grocery stores. You might not get every single ingredient for every single kind of bread at the local market, but hey, that’s what the internet is for.One last thought: Someone asked in one of the questions above whether this machine is “worth it,” meaning, I presume, whether it is worth the money. Well, GF bread costs about $7 per loaf where I live (Massachusetts). So I will need to make 14 loaves before the cost of this machine equals what I would have paid for store loaves. Of course, I will be buying the ingredients too, and they are expensive–so let’s triple the goal to 42 loaves before the machine pays for itself. Right now I am up to 8 loaves, and making #9 today. That’s in three weeks. So I’m guessing that this little experiment will have paid back its cost in about 4 months. When you realize that the loaves it makes are about 2 lbs each, instead of the 1 lb loaves I get at the store, then I will reach the “break-even” point even sooner–about 2 months. (And when you add in the cost of my own gluten-y bread that I have stopped buying because I like the GF stuff so much… well, it’s even sooner than that.)Overall, I am thrilled with this purchase and recommend it to anyone looking to make gluten-free bread. I haven’t used it for anything else and I am not likely to, so I can’t recommend it for that.TL;DR It’s a great machine for GF bread, worth buying.
Know Well! –
I bought this specifically for GF bread making. I have found a couple recipes online that came out really yummy. I am happy with my purchase since buying GF bread is so expensive and it’s usually not great tasting. But, here’s what I would do differently if I were buying it again today.- The manual doesn’t explain how to get the bread pan out. Both my husband and I were trying to pull it out without breaking it. Thankfully I found a video someone posted because she had the same issue. Many people commented to thank her since they were in the same spot as me. You have to use the handle to turn the whole bread pan counter clockwise in order for it to unlock. From that diagonal position, you pull the pan out. To put the pan back in, you just do the reverse.- The chemical smell was REALLY strong… to the point of giving my family members headaches and signs of inflammation. I did two 10-minute bakes (the manual recommends doing it once) and even in my first batch of bread, it continued to gas off. Had I known it was going to be so strong, I would have done the pre-bake and my first bread outside or in the garage. I did see one review who said his roommate and he had this same issue. I wish I took that more seriously! My second loaf is in process right now in the backyard. Even after 24 hours with an industrial air filter, our house still smells.If I had an unlimited budget, I would have opted for the Zojirushi. But I am very happy with the GF bread from this bread machine!
Leslie 4Love –
Wow, I’m super impressed with this bread maker and the cookbook “The Gluten-Free Bread Machine Cookbook.” On my first try I got spectacular results! I was so tired of the limited, poor tasting, and expensive options for gluten-free bread. And now I have TONS of options given this bread machine.It is easy to use, and I did the initial “gassing off” three times just to be safe (it’s only 10 minutes each time so no big deal). The footprint of this machine is perfect – not too big. My machine didn’t walk at all on the counter, as I think the gluten-free setting is not that intensive.Here’s the kicker…my first gluten-free loaf (in the pictures) was made at a cabin at 9,800 elevation! I live at 5,300 elevation so I knew I would need to do adjustments for that, but the altitude jump at the cabin was huge. I wasn’t counting on it coming out. I’m so impressed – moist, delicious, sliceable bread! I would compare it in density to the Kim and Jakes Peasant bread, but more moist and flavorful. The smell of freshly baked bread cooking is awesome, but the smell of the yeast in the freshly baked bread is truly wonderful. I’m so glad I got this bread machine!
Debra P. Cross –
Product was exactly as shown online. Works perfectly. Easy to use. Only slight complaint is that it is a little noisy, but I don’t know maybe all bread machines make this much noise. No so bad that I would send it back. Bread comes out great which is the real point!!
Haskell –
It is easy to use. Wet ingredients, dry ingredients. Come back two hours later to bread.
Phyllis Cochran –
The only thing I would like would to be more recipes.
Leesa Mergens Eason –
I used this product because it has Gluten free setting, since I have problems eating foods with wheat ingredients and I have to use non dairy products.
sld –
I really like this bread maker. My bread turns out perfect every time. I even used it to make my dough for dumplings and they turned out good! My old bread maker puked on me after 26 years and I wanted to buy the same brand but couldn’t find one. I assume they quit making them or it’s made under another brand name. The only thing I don’t like about this bread machine is the digital readout. On my old machine the display had red letters that were LED so it could be read easily and it had red lights for each step of the process, i.e. knead, rest, rise, & bake. With this machine you have to look down, over it, and it is hard to see the little arrow that points to which step it is in. I’ve always had good luck with Hamilton Beach products.