

Sale!


Best Sale 💯 Lekue Silicone Bread Maker, Model # , Brown 🌟
Original price was: $29.13.$23.30Current price is: $23.30.
- Control the delivery date and try to deliver it in the fastest time
- The quality solution for all your needs.
- 100% High Quality Guarantee
- Safe Payments, Secure Personal Information

- Material: Silicone
- Brand: Lekue
- Color: Brown
- Shape: Round
- Product Dimensions: 9.06″D x 11.02″W x 5.12″H
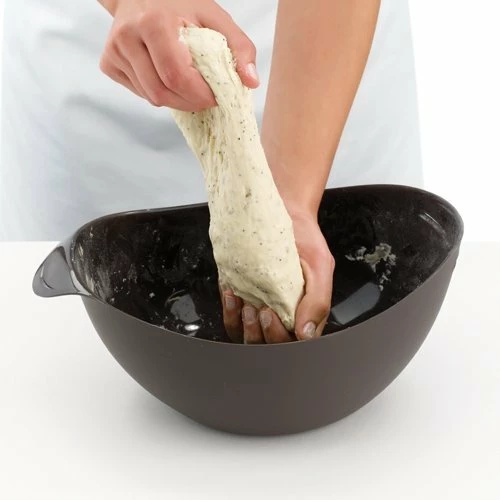
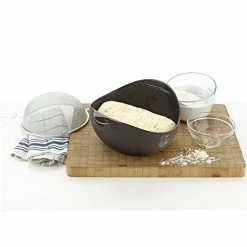
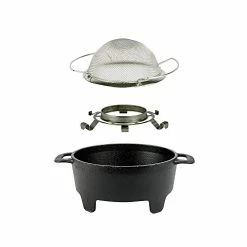
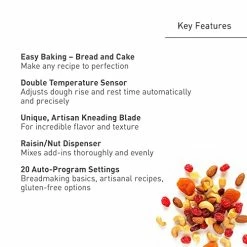
- Its versatile design makes it possible to bake real homemade bread in one single container
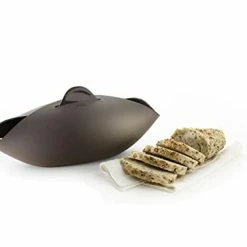
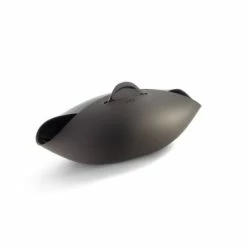
- Shaped as a partially closed bowl, the bread maker allows steam to circulate inside, making the dough moist and preventing the bread from drying out
- The side openings allow hot air to circulate inside the Bread Maker giving bread a crusty, golden texture
- Includes easy recipes to enjoy the taste and smell of traditional homemade bread
- Suitable for microwave and dishwasher safe; made of 100% platinum silicone to withstand high temperatures of up to 428ºF (220ºC)
4 reviews for Best Sale 💯 Lekue Silicone Bread Maker, Model # , Brown 🌟
Add a review
Related products
Sale!
Original price was: $279.00.$82.00Current price is: $82.00.
Sale!

Bread Machines
Original price was: $79.95.$63.96Current price is: $63.96.
Sale!

Bread Machines
Original price was: $194.00.$96.00Current price is: $96.00.
Sale!

Bread Machines
Original price was: $19.00.$15.20Current price is: $15.20.
Sale!
Original price was: $229.94.$86.00Current price is: $86.00.
Sale!


Original price was: $99.97.$83.00Current price is: $83.00.
Sale!
Original price was: $59.99.$47.99Current price is: $47.99.
Sale!

Original price was: $92.85.$74.28Current price is: $74.28.
Ramon L. Ruona –
Lekue Bread baker/ recipe to amazonThis is a really fine product. I’m 84 years old and was having difficulty handling the weight of the Dutch oven that I used in making bread, particularly when it was 400 degrees, so I thought I would give the Lekue a try. Admittedly the booklet’s recipes aren’t too helpful. What I now use it for is making whole wheat Irish soda bread and it does a great job. My recipe is simple, and I mix it right in the cooker, so I don’t have any dirty bowls to wash. For what it is worth here is the recipe: Tools needed:1 teaspoon measure, 1 tablespoon measure, 2 cup mixing cup for the flour, bran, and buttermilk and an optional egg-use the cup for measuring the flour and bran first, plastic scraper for mixing, a fork for whipping the egg, and the Lekue cooker. Turn on your oven to 400 degrees Fahrenheit or 200 to 205 Celsius, so it has time to heat. Dry ingredients (put the ingredients directly into the Lekue cooker): 2 ½ cups of whole wheat flour 1 cup of bran–½ cup of wheat or oat bran and ½ cup of ground flax or chia seeds or a mix of the two. Remember to use your mixing cup for measuring the flour and bran before you use it for the wet ingredients. 1 teaspoon of salt ¾ teaspoon of baking soda-in Ireland it’s called bread soda-tip from the Irish housewives; baking soda and baking powder tend to form small clumps which will ruin your day if you bite into a lump at breakfast, so put the baking soda and baking powder it in the palm of your hand and press it with the back of a spoon to break up any clumps- then dump it in the Lekue baker2 teaspoons of baking powder (why I don’t know, but it works, i.e. the bread rises) Mix the dry ingredients well with your plastic or silicon scraper/spoon. Make certain they are very well blended.Wet ingredients:Crack one egg into your 2 cup measuring cup and whisk with a fork. I’m not certain if an egg is necessary, but I think it makes the bread hold together betterAdd 8 to 12 ounces of buttermilk start out with 8 ounces (you can use dried buttermilk–one brand is Soco Cultured Buttermilk–which is ok, and if you use dried buttermilk mix it with the dry ingredients, but I think liquid makes a somewhat better bread). Start out with 8 ounces of buttermilk or water if you used dried buttermilk and mix it with the egg.Using your tablespoon add 2 tablespoon of cooking oil to your buttermilk and egg mix and stir it up. Using the same tablespoon you used for the oil add 2 or 3 tablespoons of honey—by using the same tablespoon you used for oil with no cleaning the honey will roll right out with no sticking and no mess. ProcedureMix all the liquids well, make a hole in the center of your dry ingredients and pour the liquids in. Here I depart from the Irish ladies. They mix with their hands, and I have done so, but it is a very wet dough and your hands will soon be covered, so now I just mix with the spoon. You will undoubtedly need more liquid to get it all mixed together, so just keep adding liquid and stirring until you don’t have any more dry ingredients to mix. Shape the mix into a loaf shape crosswise in the Lekue baker. Cut or poke a line down the center of the loaf, so the bread can expand. I just use the fork I used to beat the egg. Irish ladies use a knife to cut a quite deep cross in the bread to let the Fairies out, or to protect the bread against the Devil, or maybe to just make certain the bread is cooked through. Close the top of the Lekue cooker and put the bread in the oven. Bake for 45 minutes, then open the top of the Lekue and cook for another 15 minutes. Take it out of the oven and let it cool for an hour or so. Use a rack, so air can circulate below. No rack–tip from the Irish ladies—two upside down forks work as well as a rack. Tip from me—I cool it on a turned off burner on the stove—works fine.This is a very good bread. 100% whole grain with added fiber and minimal cleanup. I only wash the Lekue cooker after, give or take, a dozen loaves. Since I am both the baker and the dishwashing machine clean up is important, and the cooker does a great job of being both the mixing bowl and cooking the bread.
Tea Drinker –
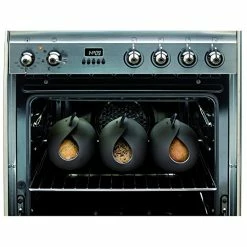
I’ve been baking 2 loaves using the Tartine method (starting with 1000 grams of various flours, 70ish% hydration and levain) for about 3 months now. I started with boules in the Le Creuset Dutch oven and moved to boules and oval loaves on a marble pizza stone with a roasting pan lid and lava rock under the stone and lid to create steam. All in pursuit of the perfect crumb and oven spring. The results were widely varied, with the most disappointment in oven spring. Also, I put lots of fillings in my loaves, like the ones pictured here – date/pecan and black sesame seed/herb. It’s not uncommon for me to have to cool down the Le Creuset between loaves to scrub baked on fruit off of it between loaves, which means reheating the oven for up to an hour again at high temp to bake the 2nd loaf.I bought the Lekue silicone baker on a whim, because it was cheap and clean up promised to be a breeze.The first 2 weekends baking with it, I did one loaf in the Lekue and another in the Dutch oven. Last weekend I even did another oval loaf on the clay baker.I liked the Lekue, but the crumb was tight, like the loaf was trying to expand, but was getting squished into being too tight. The loaves turned out like footballs with pointy ends.This weekend I was determined to find a solution to the Lekue not being quite big enough for me loaves to fully spring. I’ve tried to capture it in photos.I needed the Lekue to be bigger, which means I didn’t want to latch it, so the bread could rise, but I also needed it to be covered, so the steam could do its thing. I left the Lekue unlatched and wrapped it in a Silpat, using metal clips to seal the ends of the Silpat where they came together above the top of the Lekue. I also a clip on each side to better deal in the steam. The clips I used were these Italian paper clips I bought years ago somewhere. I imagine regular paper clips might work, but the ones I used are tough, so I knew they wouldn’t pop off. In this way, I artificially made the Lekue bigger.And it worked! Both loaves expanded beautifully and produced loaves that rose bigger and had a looser crumb than they would have been in the latched Lekue.I baked the loaves, “clipped in,” for 20 minutes at 425F. Then I removed the whole thing from the oven and popped off the clips, removed the Silpat and returned the unpatched Lekue to the 425 oven for another 20 minutes. Then I pulled out the bread, removed it from the Lekue and placed it back in the oven on the racks for another 5-10 minutes to ensure a crispy crust.I love the shape of the bigger loaves. They don’t have weird pointy ends and the slices are the perfect size for morning toast or the amazing late summer BLT’s we are enjoying for dinner at the moment.I’m putting away the Le Creuset and storing my boule bannetons for the time being. Finally after months of experimentation, I’ve found a perfect solution for my weekend sourdough baking needs.I particularly love the super easy cleanup – just throw the Lekue in the dishwasher. And I also love that the bannetons for standard oval loaves (which I use with the Lekue) fit much more easily in my always packed fridge than the boule bannetons.I am giving the Lekue 4 stars, because it’s a tad too small for each of the 2 loaves recipe that the Tartine method makes. Please, please, please Lekue… make a bigger option!
Jennifer DeFrates –
I use this all the time to make sourdough bread. If you don’t bake bread regularly this might not be easy to use right away, but it was for me. Now I can weigh, mix, proof, stretch, proof and bake all in one. Seriously, so easy. The only thing I don’t like is that it doesn’t close well enough for proofing. I have to cover it with plastic wrap and a towel to keep air out so the bread doesn’t get dry spots. Also, it is not the easiest to clean. The first time you bake with it, it smells chemically but the bread didn’t taste like the smell. I used it for cinnamon raisin sourdough and the cinnamon smell stayed with the bowl. I will need another one to separate savory and sweet flavors. But I can whip up a quick loaf in this easily. It has made my little bread baking for friends and family much easier.
R Nix –
When I bake bread, I use these silicone pans. They clean up well. They can only stand heat to 425degrees. That is not a problem in baking bread.